Wednesday, February 4, 2009

Exercise Four - Stephen James Legomski


Living in an apartment building, we all know that every once in a while a repulsive stench can creep in from the halls when a neighbor cooks. This is why one of my favourite objects, helps to fill the air in my apartment with a pleasant fragrance. My oil burner.

Affordance: When looking at the oil burner, you can instantly notice the two parts. It is divided in two and manufactured with distinct characteristics: the candle holder can be identified by the circular indentation at its base, and the placement of the oil at the top can be identified by a half spherical cup.

Constraint (physical): The depth of the indent allows the candle to sit in place and not fall out of its containment, and the depth of the cup allows the oil not to spill out over the edge. 

Visibility: There are no colored lights or levels to indicate any procedures (ex. no red light to show that the candle is burning). The start-shaped holes on the side of the burner act as indicators. If the opening of the candle holder is opposite you, you can tell that the candle is lit by looking through the holes and seeing the flame or light. The oil starts to smoke when the flame under it heats it up enough, acting as an indicator that it is actually working. 

Mapping: The height of the cylinder plays a big part of the oil burners purpose. Since there are only two parts, one on top of the other, someone placing the candle automatically knows it has to heat up the oil so it goes on the bottom and the oil on top. There are no add features to confuse anyone.


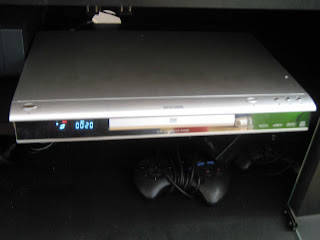
This piece of technology brings boredom to an end but at a cost: no patience for the stress it brings upon you. It is still on thing that fascinates me; but the way in which it is made should be improved. The object I chose that I hate most is my KOSS DVD player.

Constraint (physical): The biggest problem I come upon with my player is when a disc is inserted on the tray that slides out. When the tray is fully extended, the top's edge overlaps the indentation in which the disc is placed. When inserting the disc, it has to be put in at an angle which, most of the time, is impossible, and ends up being placed accidently over the edge of the indentation. Once the tray slides back in, the disc skips repeatedly and gets scratched. Most people would wait to see if the disc is inserted properly, but another problem with this player is that about ninety percent of the time, the tray slides out and then slides back in automatically. So, by the time I have the disc halfway into the holding spot, it retracts and catches the disc, bringing it into the player in the wrong position.

Visibility: In light-colored blue, the play symbol is lit to notify the user the disc is playing, but the distance people are from the player, it is impossible for them to see it. Like the old VHS players, it would be better to see a green light, located appropriately. , along with a red light to show it is stopped.

Mapping: As always, I forget where I place objects in my home. Most of the time this includes the DVD remote controller. The DVD player can help in four ways if I misplace the controller: it has a play, stop, pause, on and off buttons. One thing I hate most of movies, are the ads. But I can't fast-forward through them because there is no button on the player. Also if I have missed a part in a movie, I am unable to rewind because of no rewind button. 

Exercise 7: Photoshop Tennis

Exercise 7: Photoshop Tennis
Josh Frechette, Bradley Crystal


Tuesday, February 3, 2009

Monday, February 2, 2009

Exercise 6- Bring a Toy by Tarz Sachdeva

Laptop Screen Cleaner

Exercise Seven - Photoshop Tennis - Charles & Katie


Exercise 7- Photoshop Tenis

Photoshop Tennis
Desiree and Justine


Exercise 6- Toy- Desiree Beaubien

Exercise 7 - Tennis Photoshop - Joe & Alan


Exercise Seven: Photoshop Tennis by Jay n Steve


Exercise 7-Tennis photoshop

By: Cathy Lai & Giustina Kean


Exercise six-Toy


Exercise six - Toy


Bring in a Toy - Katie Goulet

Rubber Fish

Exercise Seven: Photoshop Tennis

In this Exercise you will be working with your partner to collaborative create a series of images that will form an emerging narrative.

We will begin with a brief Photoshop tutorial, where we will go through the following steps as a group. It is important that you follow these steps carefully so that your narrative emerges as seamlessly as possible.

1) One partner should open Temporary Storage, and create a folder with the following format: FirstName1_FirstName2. For example, Maya and I would make one folder called Jesse_Maya.

2) Mine the web for image content. Go to:

http://www.flickr.com/creativecommons/


Note that we should only use images that use an appropriate form of Creative Commons license. Read over the Creative Commons information on the right. The first category (Attribution License) is the most appropriate for our purposes. Click on "see more," or go to:

http://www.flickr.com/creativecommons/by-2.0/

Now, find 3 images that you like (do this quickly - you'll have a chance to redo the exercise later), and download them to your desktop. Click on "all sizes" at the top left of the image. You want the large file size (1024 x 768).

3) One partner should open Photoshop. One partner should create a new .psd file in Photoshop with the following characteristics: 1024 x 768 pixels, 72 pixels/inch resolution, RGB 8 bit colour mode. Save this file to your folder using the same FirstName1_FirstName2 format, ie.: Jesse_Maya.

Now, open the images you downloaded to your desktop in Photoshop, and select one of these images as your background, which will begin your narrative. Cut and paste this image into your .psd file. Manipulate the image, and add content from your other images. There are many image manipulation tools in Photoshop - Maya and I will go over a few of them to get you started.

4) After a few minutes, you will prepare the file for transfer to your partner. Follow these instructions carefully.

Save your .psd file.

Select Save-as, select JPEG as your filetype, and change the name to FirstName1_FirstName2_FrameNumber, ie.: Jesse_Maya_1.jpg.
In this way, you'll end up with a .jpg "snapshot" of your .psd file at the moment of transfer.

Now, close the .psd file.

Please ask Maya and I for help if this is at all confusing. There should only ever be one .psd file per pair.

The second partner should now re-open the .psd file and add their own visual information to move the emerging narrative forward.

Don’t completely erase your partner’s work - that ruins the game and destroys the narrative. Whenever possible, use layers to separate the elements in your .psd file. This will give both partners more flexibility in re-working your collaborative creation.

5) Repeat the transfer step 1 more time, adding to the narrative until the "tennis match" is over and you have a narrative that is 3 images long.

This exercise should be re-started at home, this time using 6 images and transferring the .psd file 4 times between you and your partner by email or another suitable method, resulting in a narrative that is 6 images long. Therefore, step 5 will differ from that followed in class, and would be as follows:

5) Repeat the transfer step 4 more times, progressively adding to the narrative until the "tennis match" is over and you have a narrative that is 6 images long.

Take a moment to ensure that all your files are in order, and to post the six .jpeg images in sequential order to the blog in a single post. Make sure both your names are in the post. Be sure to adequately credit the source of your images as per the Creative Commons licence if you have not used your own images.

Reference Material: Designing for Interaction 89-119

Click here to download Designing for Interaction 89-119.

---
"The craft of interaction design is really the craft of creating the models, diagrams and documents that communicate the designer's designs. These representations, and the testing of those with clients and users, are the designer's bread and butter. They are what designers use to do their most important work, moving their knowledge and vision from their minds and hearts to their hands and to the design itself . . . Designers should strive to make each representation a designed artiact, filled with smart, deliberate choices." (Saffer 119)

Project Two: Design for Fun

Click here to download Project Two.

--
Project Two
Design for Fun
A Positive User Experience


OVERVIEW

You are to apply your design skills to create a positive user experience. This experience, which will take the form of a toy, will reflect your emerging command of:

• Ethnographic observation, analysis and interpretation
• Strategies for establishing structure
• Human perception and strategies for conveying information
• Basic principles of experience design
• Narrative and metaphorical strategies
• Personas, scenario-planning and user-specificity
• The nature of positive user experiences


BREAKDOWN

1. As with any design project, begin with research and brainstorming. The aim at this stage is to develop an understanding of our experiences with toys. Collect as many different toys as possible. Observe and analyze how each design succeeds or fails to create a positive user experience. Compile and interpret these analyses, and attempt to establish structure: what is fun? (This portion of the project will be completed in the following Exercise: “Deconstruct a Toy: What is Fun?") Also, begin to generate concepts for your own toys in your sketchbook.

2. Expand your “fun research” to include games. Play several games, and deconstruct the experiences. How are games different from toys? How can narrative and metaphor be employed to contribute to a positive user experience? How can these strategies be incorporated into the design of a toy? (This portion of the project will be completed in the following Exercises: “Photoshop Tennis” and “A Meeting in a Supermarket.”)

3. Develop and present five concepts for a toy. Solicit feedback on your concepts from your partner from Exercise Six, and deliver feedback to them in return. Your feedback should consider how each concept responds to our notions of what constitutes fun, and how the course material presented to date can be employed to improve the concept. Your five concepts must be posted to the blog by 08:30 on Wednesday, February 11, and your feedback must be posted to the blog by 18:00 on Friday, February 13.

4. Narrow your concepts down to one, and produce a working prototype. The prototype need not be exquisitely constructed, but should be robust enough to survive user testing. You will not be permitted to explain your toy, so any required instructions should also be prepared in prototype form. You must bring your prototype to class at 08:30 on Monday, February 23 for user testing by your colleagues.

5. Create a formal proposal that details your final concept. Your proposal should include visual representation of your concept, as well as a written description of why your toy or game is fun and how it employs the course concepts presented to date. You should incorporate improvements derived from user testing. Your proposal must be posted to the blog by 08:30 on Monday, March 2.


DELIVERABLES

08:30 on February 9: Five toy concepts, posted to the blog

18:00 on February 13: Constructive feedback on your partner's five
toy concepts, posted to the blog as a comment on their original post.

08:30 on February 23: A mock-up of your final concept for
user-testing

08:30 on March 2: A formal proposal of your revised final concept,
posted to the blog.


EVALUATION

Five concepts in sketch form, posted to the blog: /5
Feedback to your partner, posted to the blog: /5
Mock-up (robustness, use-ability, “fun-ness”): /8
Formal Proposal (proposal quality, clarity and
convincingness; synthesis of course material to date): /7

TOTAL: /25

Exercise Six: Deconstruct a Toy - What is Fun?

PART 1 (Before Class):

Please bring, beg, borrow or steal (OK, don't steal) one or more toy from home or elsewhere to class next week (February 2). Our definition of a toy is as yet undetermined, so feel free to challenge our preconceived notions. The only restriction is that the toy not be something that you already have in your bag (i.e. not your cell phone).

PART 2 (During Class):

Exchange toys with your collegues. Ethnographically observe your assigned partner (note that this is your partner for Project Two) playing with the toys. As noted in Class Two's Ethnography presentation:
  • Take detailed descriptive notes of what you observe.
  • Where possible, capture your partner's views of their experience in their own words.
  • Clearly separate description from interpretation.
  • Include in your notes your own thoughts, feelings and related experiences - these are also field data.
With your partner, analyse your field observations by distilling them into a series of answers to today's fundamental question: "What is Fun?" Record these answers on the sticky notes provided. Collectively we will use these sticky notes to interpret the structure of fun.

PART THREE (After Class):

Post an image of your toy to the blog. Post the transcript of your field notes and your analytical distillations as a comment on your partner's post. I will post an image of our collective interpretation to the blog.

exercise 5 MUSIC VIDEO


Sunday, February 1, 2009

Exercise Five - make a movie

Exercise Five - Make a Movie
Katie Goulet


Exercise 5 - Make a Video, Make a Diagram

Exercise 5
- Alan Lau -


Movie:


Diagram:

Exercise five Josh


Unfortunately, I had some problems when rendering and saving the video. Otherwise, enjoy, and I hope to post a better version at some point, if possible.